Monitoring MDADM RAID arrays with Cacti & SNMP
As I’ve mentioned in a previous post, I use MDADM RAID arrays on Ubuntu for storing all of my media, plus a separate array elsewhere for backups. I also use Cacti to keep an eye on my different machines, combined with the Threshold plugin to allow monitoring of anything going wrong within the network. While MDADM does allow you to use the monitoring feature to email when a disk gets dropped, I was looking for something that would hook into my current infrastructure, and was surprised to find that no templates existed to allow graphing MDADM details in Cacti – so I set about making some! This post explains how to set this up on your own machine.
Rather than using a local script, I have used SNMP to allow for this being added on multiple machines and monitored remotely. So, our first step is to get the information into our SNMP configuration. This is accomplished using two scripts (as MDADM requires root to run; we’ll see how this is achieved shortly) – in order to get them, you need to run (as root):
$ cd /etc/snmp/
$ svn co http://projects.mattdyson.org/projects/cacti/mdadm/scripts/ mdadm
$ cd mdadm
$ chmod -R 0777 *
This will download 2 files – mdadm-monitor and mdadm-read. The first one is the “business end” of the operation, this will take various arguments (as you’ll see in the snmpd.conf shortly) and output an indexed list representing the value for each array in our system. The mdadm-read script simply calls mdadm --detail /dev/$1, so we can add this to /etc/sudoers to allow us to access this information without requiring a root password each time – add the following line into /etc/sudoers in order to make this happen. You may need to change the user (“snmp” in this example) to whatever snmpd runs under on your system
snmp ALL=(ALL) NOPASSWD: /etc/snmp/mdadm/mdadm-read
At this point, you should be able to run /etc/snmp/mdadm/mdadm-monitor Name as your SNMP user and see a list of all MDADM arrays on your system!
In order to access these through SNMP, we need to edit /etc/snmp/snmpd.conf and add the following lines:
extend .1.3.6.1.4.1.2021.80 Num /etc/snmp/mdadm/mdadm-monitor Num
extend .1.3.6.1.4.1.2021.81 Index /etc/snmp/mdadm/mdadm-monitor Index
extend .1.3.6.1.4.1.2021.82 Name /etc/snmp/mdadm/mdadm-monitor Name
extend .1.3.6.1.4.1.2021.83 Active /etc/snmp/mdadm/mdadm-monitor Active
extend .1.3.6.1.4.1.2021.84 Working /etc/snmp/mdadm/mdadm-monitor Working
extend .1.3.6.1.4.1.2021.85 Failed /etc/snmp/mdadm/mdadm-monitor Failed
extend .1.3.6.1.4.1.2021.86 Spare /etc/snmp/mdadm/mdadm-monitor Spare
extend .1.3.6.1.4.1.2021.87 Degraded /etc/snmp/mdadm/mdadm-monitor Degraded
Once this is done, you’ll need to restart SNMP with /etc/init.d/snmpd restart, and then you should be able to run snmpwalk -v1 -cpublic localhost .1.3.6.1.4.1.2021.82 (if you have snmpwalk installed) and see some output similar to this:
iso.3.6.1.4.1.2021.82.1.0 = INTEGER: 1
iso.3.6.1.4.1.2021.82.2.1.2.4.78.97.109.101 = STRING: "/etc/snmp/mdadm/mdadm-monitor"
iso.3.6.1.4.1.2021.82.2.1.3.4.78.97.109.101 = STRING: "Name"
iso.3.6.1.4.1.2021.82.2.1.4.4.78.97.109.101 = ""
iso.3.6.1.4.1.2021.82.2.1.5.4.78.97.109.101 = INTEGER: 5
iso.3.6.1.4.1.2021.82.2.1.6.4.78.97.109.101 = INTEGER: 1
iso.3.6.1.4.1.2021.82.2.1.7.4.78.97.109.101 = INTEGER: 1
iso.3.6.1.4.1.2021.82.2.1.20.4.78.97.109.101 = INTEGER: 4
iso.3.6.1.4.1.2021.82.2.1.21.4.78.97.109.101 = INTEGER: 1
iso.3.6.1.4.1.2021.82.3.1.1.4.78.97.109.101 = STRING: "md0"
iso.3.6.1.4.1.2021.82.3.1.2.4.78.97.109.101 = STRING: "md0"
iso.3.6.1.4.1.2021.82.3.1.3.4.78.97.109.101 = INTEGER: 1
iso.3.6.1.4.1.2021.82.3.1.4.4.78.97.109.101 = INTEGER: 0
iso.3.6.1.4.1.2021.82.4.1.2.4.78.97.109.101.1 = STRING: "md0"
Excellent! We’re now up and running with details of all MDADM arrays being output to SNMP, including numbers of active, working, failed and spare disks for each array! Next up, lets add the SNMP query XML into our Cacti resource directory (substitute the relevant Cacti path for your system). The code I’ve written works fine on net-snmp 5.4.3, but I believe lower versions may not play nicely with using the long OIDs in net-snmp_mdadm.xml – you may need to remove everything in the OID after .1.3.6.1.4.1.2021.8<X>.4
$ cd /usr/share/cacti/site/resource/snmp_queries/
$ svn co http://projects.mattdyson.org/projects/cacti/mdadm/queries/ mdadm
This is referenced by the Cacti Data Template that I have put together, which can be downloaded here. Once you’ve used the “Import Templates” feature to import this file, add the SNMP – Get MDADM Arrays template to a host, and create the relevant graphs for each of your arrays. Here’s one of mine that’s a little boring, but at least we know everything is okay!
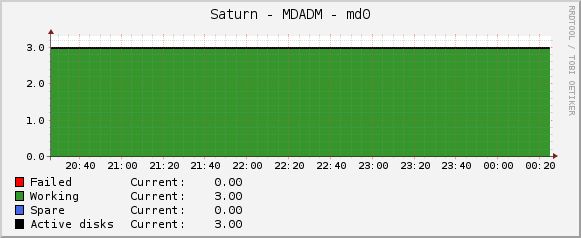
There we have it – MDADM data available in Cacti! I’ve also created a Threshold template that monitors the Failed data source for any value other than 0, and then kicks off the usual alerting to let me know to replace a disk, but Cacti won’t let me export that one easily, and it was simple enough.
I haven’t fully tested this method with multiple arrays on the same host yet, please let me know in the comments if you find any problems, and I’ll do my best to help out.
Update 08/05/13: I’ve updated the graph template to make a bit more sense when an array is rebuilding.
Update 05/11/13: The graph template should now parse properly – thanks to Evandro Nabor for spotting the error!
Update 28/12/13: Doh! My ‘fix’ for the graph template above introduced another problem! I’ve updated the file again, and hopefully things should now be working – thanks to C. Alexander for spotting this!